Showing posts with label home decor. Show all posts

Monday, April 22, 2013

Master Bedroom Worth the Wait

Life has been ridiculously busy lately, but abundantly blessed. However, that has translated into little to no blogging, but after a recent perfect purchase, I had to show you our master bedroom renovation. It actually began at the end of December, but I didn't have all the pieces until last weekend. Now it's finally ready for a post all of its own.

This is the waaay before picture. Can you see the potential?

Notice the dirty walls, dark trim, gold light plate, etc. It stayed like this for a year :(


Not water damage luckily in the picture below, but ugly all the same.


First, find the kitty? Not sure how she got up there, but we were impressed. Also notice the blinds. Yes, some are missing, but also some are being held up with bandaids. Lovely. Again, we had these up for a year, but other projects just kept coming up first.


It was well worth the wait! After some paint, new trim, a new ceiling fan, furniture, and accessories, our master bedroom finally feels like a true retreat! Take a look.


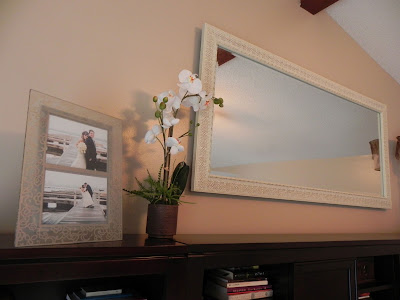
The final piece was the mirror above the bed. The room only has the sliding doors so I wanted to bring in something that would cast light around the room. But let me tell you, huge mirrors don't come cheap. We found several we loved at Pier 1 and places like that but at a $200 price tag or more. I just couldn't justify that for a mirror I wouldn't even use to look in! So after several months of casually searching I found it! Kohls is my favorite. This mirror also had a $200 price tag, but after awesome sales, a coupon, and a discount for a scratch you can only see if I point it out, we got it for about $40.


And how perfect is it? It has swirls along the edges just like the frames we received for our wedding and like the curtains I found for the sliding door that let in the light, but still provide some privacy.


It was a long process, but I love it.

Monday, March 11, 2013

Living Room Reno was No Picnic

You would think that after redoing half of the rooms in our home that I would be a good judge of how long a project will take. Apparently I'm not because I woke up a few weeks ago on a four-day weekend and told Ben we were going to redo our living room, which means the entry way and hallway also needed an update at the same time. I didn't think it would be that hard: paint, new trim, and new doors. 

Well after 16 hours of painting walls (the wrong color the first time); painting, cutting, nailing, and touching up 350 feet of trim; routering, cutting, painting, and hanging seven doors; and all the little things that crop up, this project took three long weekends and many evenings between those weekends. But I LOVE it! And I'm so happy we did it because it would have been near impossible with a baby.

So if you have a minute (or several since this was a huge project) take a look through the pictures below.
Before pic. Like way before. Like when we moved in. You can see the dining room and kitchen hadn't been touched yet. 

Looking back at the entry way. 

The before of the hallway.

The first step is always to take down all the trim (we've almost replaced every piece in the house already!).

All the nasty old trim and doors. The doors were so cheap and lightweight that I could carry them easily. Not the best sound-blocking doors.

Ben got a router for Valentine's Day and he was about as happy as a little boy with his first pocket knife. He's wanted one for years. He has many projects planned for this baby, but it's first job was routering the door for hinges and doorknobs. 

All the doors were slightly too wide and slightly too tall. Luckily it was still a cool day here in Florida because that was a lot of work. Thanks, honey!

This is about one third of the trim. Do you see the workspace Ben created for me? Yep, he took an old ladder apart and propped them up on the workbenches and random stuff in our garage. It was pretty genius and made painting go a lot faster. 

So this was the color I picked out originally. When we went to go purchase the paint I wasn't 100% sure what color I wanted (though we got the no fume paint since I'm pregnant. It was awesome and will be all we get in the future even when not pregnant. I loved not getting dizzy from the fumes!). I found a mustard color and thought it might be perfect but was positive Ben wouldn't agree. He must have been feeling very agreeable because he said sure so I about ran out the door with it.

As we were painting though I started to get worried. I liked the color alright, but there was a LOT of it. Our walls get very tall in the living room and then there is the entry way and hallway that all needed the same paint. 

We just kept telling ourselves we'd like it when it was all finished. Then we said we'd like it in the morning after almost eight hours of painting. In the morning I even told myself I'd like it at a different time of day. If you can't tell, I really didn't want to have to do it all over again. It was so much work. But after an hour of looking at it the next morning over well deserved cinnamon rolls, we agreed there was way too much mustard at this picnic. There was yellow EVERYWHERE! 

We tried to have fun with it as we began our second paint job the very day after having completed the first, haha.

But I did get really tired apparently. Ben took this while he was painting along the ceiling. Naptime.

Afte all that painting, we got to the parts, like hanging doors!

I can't tell you what a difference the doors made. It was night and day, especially in the other rooms we've redone like the guest room and master (post coming soon).

We looked at the home improvement stores in our area but were unimpressed with the doorknob selection. They were all so boring and expensive. So I found these online! They weren't cheap, but at least they were unique. I love them. 

This is me cuddling with our puppy while Ben nailed trim up. Bay has overcome her fear with all the power tools except the air compressor and nail gun combo. Poor thing was so worried, and there was 350 feet of trim to install. I felt like the worse puppy mom in the world.

After trim came time for hanging up pictures. The finishing touches are icing on the cake. This is my husband using a laser to hang our pictures just right. It definitely came in handy.

And the final product looks like this ...

This will soon change once again as the right-hand corner will become my office area, but that's a future post. Isn't this color better than the mustard?

The hallway! Do you remember what this looked like?! If not see below.

So dark! Now the hallway looks more like "the light at the end of the tunnel" instead of "passage to Hades." We have also purchased three can lights to put along the ceiling since right now there is just the one 80s light. The one light just doesn't cut it. We kept grumbling while painting that it was too dark. But that's another future project.


All finished! It finally feels more like home, and I just feel calm when I'm here. Sorry for the long post, but this was a long project, but one we are very happy with.

Monday, December 17, 2012

Pretty Bones: A Year in Review

A year ago today my husband and I moved into our first home. We made a total of about 10 trips and made the whole move by ourselves since we were 16 hours away from family and most of our friends had gone home for the holidays. It was hard work, but it was just the start as we got busy renovating the pretty bones of our home.

I thought I'd do a "year in review" partially so I would have a reason to go through old pictures and partially to just recap on what we've done and what we still need to do. I'm pretty proud of what we accomplished; what do you think?

Coffee table made the 16-hour trip from Illinois to Florida, was sanded, stained, resanded and restained (due to a streaky first attempt). It was a good first project and looks great in our living room!

Operation HOTEL GUEST was our next project since we had family coming to visit. We wanted a beachy theme since we live in florida. 
Operation EVEN STEP was an important renovation, but also a rather sad one because our puppy has dug the whole thing up :( But it looked good for a little while and she won't be a puppy forever, right??


Operation MAGICAL OASIS aptly named after the color of teal we put on the walls. My husband engineered a platform for me so I wouldn't have to lean over to load and unload the wash. It's been one of my favorite renos!

Operation SPLINTER SPINDLES was the result of one of my irrational urges to remove the 1985 spindles immediately. I'm so happy I was overcome with that need because I LOVE the outcome. This was the first reno that finally made our home feel like our home :)
Operation SPLINTER SPINDLES II was a direct result of the SPLINTER SPINDLES since we had to patch both sides of the wall where the spindles had once been. Then we painted our cabinets, added new hardware, painted the walls, and my dad and husband added a backsplash and under-cabinet lighting. The result is so homey. Someday I hope to tear it all out haha, but not for a few years.

Operation FALLOUT was exactly like SPLINTER SPINDLES II in that it was necessary since we had taken out the spindles and updated the kitchen. Thanks to my generous co-worker I was able to repurpose a table that has been frequently habited ever since it made it's grand entrance. We never thought we'd use it so much, but we really have.


So there you have it! That's what we did this year and we've already started on yet another project, but that's a post all of its own. We still have lots to do, but I think we've gotten a good start on it! 


Thursday, November 1, 2012

Operation FALLOUT: Repurposing Dining Table

Our home is rather strange in that it has two dining rooms. That's not entirely the strange part. The strange thing about having two dining rooms is that they are right next to each other. If you are going to have two dining areas, at least separate them a little, right? It's weird, but what I really cared about was the fact that it was also ugly. 
See. Ugly. 
Luckily it just so happened that because we were redoing the "formal" dining room right next door and giving the kitchen a facelift, so we had no choice but to redo the "informal" dining room as well. A brand new coat of paint and new trim made a huge difference.
See. Not ugly.
But it was still missing that essential part of a dining room ... a table. As fate would have it I was explaining my predicament to a co-worker. Our "formal" dining room (hard to keep them straight, I know) table was the first thing Ben and I bought as a married couple. Since the one I had prior to graduating college I found on the side of a road, we splurged and got one we loved. However, we didn't feel like doing that twice so I was going to start scouring roadsides again. My amazing co-worker had a better idea. She asked me to come get her old table out of her garage! Score!
How perfect is that? It's even round to fit the bend in the window! We loved it, but it needed a little love after receiving lots from her children when they were growing up. So we decided to restore it. We'd already done the staining thing and this had so many nooks and crevices, we decided to try the paint route. So first I sanded the top. We got a primer that didn't need sanding, but the top is the focal point, so I wanted it to be primed and ready before the actually priming began. Seems redundant, I know. 

Next we had to get it inside the house. Unfortunately it was too big to fit through any of the doorways except our sliding door all the way around the house. But I married an ox of a husband!
He even waited for me to run around the house looking for my camera so I could take this picture! Best!
After I sanded the top and Ben found a way for it to reside inside our home I got priming.


We used Zinnser primer. I had heard good things and only have good things to say about it. However, it's not like other primers. This stuff was like super glue. And being the messy painter I am I found it in my hair for weeks after. Advice: wear a hairnet :)

Chairs before.
Chairs with primer (and Instagramed).

 The worst part about this project was how intricate the chairs were. So many rods and curves and carvings. It killed my back, but Ben is brilliant and turned them upside down on a stool so I could continue painting with less backache. It still wasn't an easy process. And then I had to do it all over again with paint!


For paint, I choose an enamel paint. It's what we should have used on the cabinets as well because it dries much harder, which is good for high traffic surfaces, such as a table top. Finally you can choose to top it all off with a wax. Wax is good because it keeps the moister from say a cup from getting to the paint. It's also cheap and might save you from future sanding/priming/repainting jobs down the road. 

Finally we added a new light fixture, some wall art, and curtains (which I found for $9 each at Target! Just hemmed them along the bottom and love them!) to make our "informal" dining room complete!


Totally different look from our "formal" dining room, but I love it. This feels comfy and cozy, while the other room feels ... well ... more formal. Hope you like!


Saturday, October 13, 2012

Operation FALLOUT Part 2

Remember when my kitchen looked like this?  
It wasn't my favorite, but after Operation FALLOUT, which was a direct result of Operation SPLINTER SPINDLES, we had a working kitchen. Not perfect, but much better. 
This past week my parents came down to visit! They live in Illinois and hadn't really had a chance to come see our new digs in Florida. But when they did come they came bearing gifts! My dad lays tile by trade and after each job he usually has a little bit left over. A few weeks ago he sent me a picture of this:
I had wanted something with glass, but also an earthy feel. This seemed perfect! So being the amazing dad that he is, he said he would bring it down when they were here to visit. What I didn't know is that he had to buy a few more boxes to make sure there was enough for my backsplash! He wouldn't let us pay for them and he even installed it while he was here visiting. BEST DAD EVER! Ben worked with my dad for about four years, so he helped. Below is the process in pictures. :) 
Ben cutting tile with a handsaw. We had limited equipment to work with.
Putting it up!
That's my dad :)
Grout. I was worried it would be too light, but we figured it would match the cabinet paint.
Ben wiping away the grout.
I helped a little bit.
And ta-dah! It's beautiful, yes? 
Now I just need curtains and some rugs to cover that ugly tile on the floor.  Someday we might be able to replace that.
A backsplash just makes it feel like a legitimate kitchen. Thanks, Dad!