Showing posts with label Renovation. Show all posts

Monday, March 11, 2013

Living Room Reno was No Picnic

You would think that after redoing half of the rooms in our home that I would be a good judge of how long a project will take. Apparently I'm not because I woke up a few weeks ago on a four-day weekend and told Ben we were going to redo our living room, which means the entry way and hallway also needed an update at the same time. I didn't think it would be that hard: paint, new trim, and new doors. 

Well after 16 hours of painting walls (the wrong color the first time); painting, cutting, nailing, and touching up 350 feet of trim; routering, cutting, painting, and hanging seven doors; and all the little things that crop up, this project took three long weekends and many evenings between those weekends. But I LOVE it! And I'm so happy we did it because it would have been near impossible with a baby.

So if you have a minute (or several since this was a huge project) take a look through the pictures below.
Before pic. Like way before. Like when we moved in. You can see the dining room and kitchen hadn't been touched yet. 

Looking back at the entry way. 

The before of the hallway.

The first step is always to take down all the trim (we've almost replaced every piece in the house already!).

All the nasty old trim and doors. The doors were so cheap and lightweight that I could carry them easily. Not the best sound-blocking doors.

Ben got a router for Valentine's Day and he was about as happy as a little boy with his first pocket knife. He's wanted one for years. He has many projects planned for this baby, but it's first job was routering the door for hinges and doorknobs. 

All the doors were slightly too wide and slightly too tall. Luckily it was still a cool day here in Florida because that was a lot of work. Thanks, honey!

This is about one third of the trim. Do you see the workspace Ben created for me? Yep, he took an old ladder apart and propped them up on the workbenches and random stuff in our garage. It was pretty genius and made painting go a lot faster. 

So this was the color I picked out originally. When we went to go purchase the paint I wasn't 100% sure what color I wanted (though we got the no fume paint since I'm pregnant. It was awesome and will be all we get in the future even when not pregnant. I loved not getting dizzy from the fumes!). I found a mustard color and thought it might be perfect but was positive Ben wouldn't agree. He must have been feeling very agreeable because he said sure so I about ran out the door with it.

As we were painting though I started to get worried. I liked the color alright, but there was a LOT of it. Our walls get very tall in the living room and then there is the entry way and hallway that all needed the same paint. 

We just kept telling ourselves we'd like it when it was all finished. Then we said we'd like it in the morning after almost eight hours of painting. In the morning I even told myself I'd like it at a different time of day. If you can't tell, I really didn't want to have to do it all over again. It was so much work. But after an hour of looking at it the next morning over well deserved cinnamon rolls, we agreed there was way too much mustard at this picnic. There was yellow EVERYWHERE! 

We tried to have fun with it as we began our second paint job the very day after having completed the first, haha.

But I did get really tired apparently. Ben took this while he was painting along the ceiling. Naptime.

Afte all that painting, we got to the parts, like hanging doors!

I can't tell you what a difference the doors made. It was night and day, especially in the other rooms we've redone like the guest room and master (post coming soon).

We looked at the home improvement stores in our area but were unimpressed with the doorknob selection. They were all so boring and expensive. So I found these online! They weren't cheap, but at least they were unique. I love them. 

This is me cuddling with our puppy while Ben nailed trim up. Bay has overcome her fear with all the power tools except the air compressor and nail gun combo. Poor thing was so worried, and there was 350 feet of trim to install. I felt like the worse puppy mom in the world.

After trim came time for hanging up pictures. The finishing touches are icing on the cake. This is my husband using a laser to hang our pictures just right. It definitely came in handy.

And the final product looks like this ...

This will soon change once again as the right-hand corner will become my office area, but that's a future post. Isn't this color better than the mustard?

The hallway! Do you remember what this looked like?! If not see below.

So dark! Now the hallway looks more like "the light at the end of the tunnel" instead of "passage to Hades." We have also purchased three can lights to put along the ceiling since right now there is just the one 80s light. The one light just doesn't cut it. We kept grumbling while painting that it was too dark. But that's another future project.


All finished! It finally feels more like home, and I just feel calm when I'm here. Sorry for the long post, but this was a long project, but one we are very happy with.

Monday, December 17, 2012

Pretty Bones: A Year in Review

A year ago today my husband and I moved into our first home. We made a total of about 10 trips and made the whole move by ourselves since we were 16 hours away from family and most of our friends had gone home for the holidays. It was hard work, but it was just the start as we got busy renovating the pretty bones of our home.

I thought I'd do a "year in review" partially so I would have a reason to go through old pictures and partially to just recap on what we've done and what we still need to do. I'm pretty proud of what we accomplished; what do you think?

Coffee table made the 16-hour trip from Illinois to Florida, was sanded, stained, resanded and restained (due to a streaky first attempt). It was a good first project and looks great in our living room!

Operation HOTEL GUEST was our next project since we had family coming to visit. We wanted a beachy theme since we live in florida. 
Operation EVEN STEP was an important renovation, but also a rather sad one because our puppy has dug the whole thing up :( But it looked good for a little while and she won't be a puppy forever, right??


Operation MAGICAL OASIS aptly named after the color of teal we put on the walls. My husband engineered a platform for me so I wouldn't have to lean over to load and unload the wash. It's been one of my favorite renos!

Operation SPLINTER SPINDLES was the result of one of my irrational urges to remove the 1985 spindles immediately. I'm so happy I was overcome with that need because I LOVE the outcome. This was the first reno that finally made our home feel like our home :)
Operation SPLINTER SPINDLES II was a direct result of the SPLINTER SPINDLES since we had to patch both sides of the wall where the spindles had once been. Then we painted our cabinets, added new hardware, painted the walls, and my dad and husband added a backsplash and under-cabinet lighting. The result is so homey. Someday I hope to tear it all out haha, but not for a few years.

Operation FALLOUT was exactly like SPLINTER SPINDLES II in that it was necessary since we had taken out the spindles and updated the kitchen. Thanks to my generous co-worker I was able to repurpose a table that has been frequently habited ever since it made it's grand entrance. We never thought we'd use it so much, but we really have.


So there you have it! That's what we did this year and we've already started on yet another project, but that's a post all of its own. We still have lots to do, but I think we've gotten a good start on it! 


Saturday, October 13, 2012

Operation FALLOUT Part 2

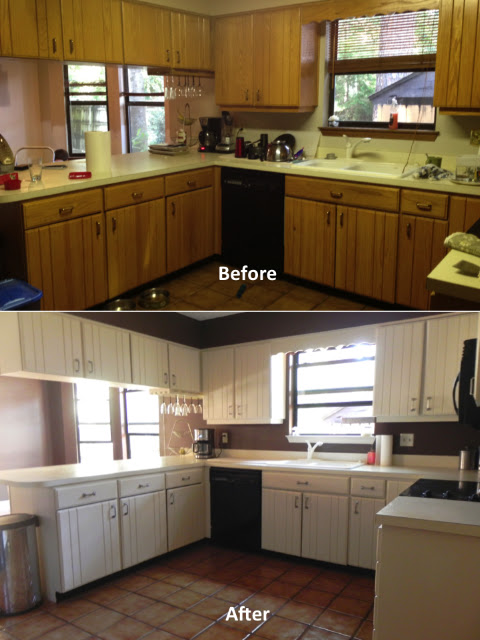
Remember when my kitchen looked like this?  
It wasn't my favorite, but after Operation FALLOUT, which was a direct result of Operation SPLINTER SPINDLES, we had a working kitchen. Not perfect, but much better. 
This past week my parents came down to visit! They live in Illinois and hadn't really had a chance to come see our new digs in Florida. But when they did come they came bearing gifts! My dad lays tile by trade and after each job he usually has a little bit left over. A few weeks ago he sent me a picture of this:
I had wanted something with glass, but also an earthy feel. This seemed perfect! So being the amazing dad that he is, he said he would bring it down when they were here to visit. What I didn't know is that he had to buy a few more boxes to make sure there was enough for my backsplash! He wouldn't let us pay for them and he even installed it while he was here visiting. BEST DAD EVER! Ben worked with my dad for about four years, so he helped. Below is the process in pictures. :) 
Ben cutting tile with a handsaw. We had limited equipment to work with.
Putting it up!
That's my dad :)
Grout. I was worried it would be too light, but we figured it would match the cabinet paint.
Ben wiping away the grout.
I helped a little bit.
And ta-dah! It's beautiful, yes? 
Now I just need curtains and some rugs to cover that ugly tile on the floor.  Someday we might be able to replace that.
A backsplash just makes it feel like a legitimate kitchen. Thanks, Dad!


Friday, September 14, 2012

Operation FALLOUT

" ... if you are comfortable in your home, everyone else will be too. That sense of authenticity is what gives a home its soul.”Interior designer Courtnay Daniels Haden from Elle Decor

Splintering spindles was the first step to making our home feel like we were breathing life back into her. There was a lot of sadness in her past and in the lives of the previous owners, but we are determined to make her smile once again. One step toward that was giving the kitchen a facelift.

It became necessary to paint once we splintered the spindles in the wall dividing the kitchen and dining room. Ben warned me that the fallout of removing the spindles would be like a snowball rolling downhill. And away we go...

Usually I have to tell the whole story and get you baited before showing the final product, but I couldn't wait this time! Now this is just cosmetic. Same countertops, same appliances, and same flooring. But it's still a huge breath of fresh air. Plans down the road will lead to bigger and better changes, but we just bought a house, so we're plum out of cash. 


Different angle. Like how I left the 'before' picture looking like a hurricane (typically I'd say tornado, but we live in Florida now) went through? Well, funny you should say that because one did tease us right in the middle of painting. I was positive it would sweep us away after I finished painting the last back breaking angle. 


And one more angle. 


When family and friends would ask what color I was painting my kitchen I braced myself to say, brown, dark brown. Most people did the stuttered, "Oh ... I can't picture it, but I'm sure it will be nice." I couldn't really picture it either, but I kept seeing photos of dark brown walls with cream everywhere else. No, none of those pictures were of kitchens, and yes, that made me nervous, but no, I didn't change my mind. I got worried after we painted the walls and Ben came in and said, "Why is it so dark in here?" Uh oh. 

Things got a lot better and brighter when I started painting the cabinets. First, we took down all the doors and pulled out the drawers. Then I painted just the fronts of the cabinets because this is a cosmetic upgrade, not a forever upgrade. We'll pull out all the stops next time. 


I sanded the fronts of the cabinets slightly before painting, but didn't dedicate any real time to it. I've read both ways of doing it online, so I think it depends on what your cabinets are made out of. Also, a helpful tip, put your cabinets in the same order as they are in the kitchen. Some of our doors would only go back on to their original locations. 


The hardest part for me was picking out new hardware. We have 46(!) cabinets in our kitchen! 46! That meant my budget for hardware was about $0.75 a handle. They don't make nice handles for $0.75. They make ridiculous handles for $80 if you are into 14k gold plated ones or the $95 ones I found bedazzled with Swarovzki crystals. And I thought we broke the budget when we splurged on utility pulls. They may not be dazzling, but I love them! Bay did, too. 


We still have a few small details we want to implement soon like curtains over the window and a backsplash. My dad is visiting soon and said he'd put one in for me (he lays tile for a living)! I told him he wasn't supposed to do that on his vacation, but he said he wanted to. Best dad ever! I'll be sure to post pictures of that project as well. 

Thoughts on how to make the black appliances not POP so much (and don't say buy new ones)? What do you think should be Ben and I's next big project? We're thinking a gut-it-and-make-it-new project :) Name a room in the house and we're probably going to breath a little soul into it as well.

Keep it pretty,
Karina

Saturday, September 1, 2012

Operation SPLINTER SPINDLES Complete

The de-spindling in pictures.

Here is how we began this process, with spindles that dated the house even more so than the wallpaper.

The spindles, along with their brethren trim, rest on a couch from their era. Ah the '80s. The garage may also need an update in the future, you think?

Look new spindles! Well that's what it felt like when my husband was framing up the gaping hole left in the wall after my debilitating need to remove spindles was quenched. We were lucky there was a decent frame in the rest of the wall that our new frame could attach to.

The next steps were to fill in the holes with drywall, tape the edges, and then putty like crazy! I puttied, sanded, reputtied, and resanded for what felt like days. I wanted it perfect. And we got close.

This was our end result ... after we hired someone to come help us perfect our putty job. The wall itself was a bit too 'wavy' for lack of a better word. We love DIY, but sometimes a professional is necessary. 
After we painted, it was time for trim. Look at that helpful puppy! The base board was relatively easy. First we painted it and then we started shaving off piece by piece until they each fit perfectly. I was lucky Ben was patient because I would have just measured to what I thought was the perfect fit and CHOP! He measured to what he thought would fit and then shaved off a little less. It took a few tries per board, but it came out beautifully.

We didn't replace the trim around the recessed part of the ceiling, but I did paint it. Slowly. But not as slowly as it took to put up the crown molding.

Crown molding looks beautiful, but I would have to seriously weigh the benefits with the amount of effort that went into to putting it up. In the dining room, I'd do it again. I love it so much!

Bay feels safe with Ben. Ben had a nail gun. Bay was scared of the nail gun, but still felt safer right next Ben and therefore the nail gun. Silly girl!

So this is what it looked like when we moved in. This is your before picture.

This is the after picture! Still needs a few more things on the walls, but at least there isn't wallpaper on the walls! We also have to paint and redo the trim in the living room, but one project at a time!


As you can see, we also replaced the old light fixture with one I love! We also put up some curtains to replace the blinds that were held up with bandaids (yes bandaids), added a few pictures, and replaced the gold vent with one that blends in with the ceiling (why you want an air vent that draws attention is beyond me). Someday we will replace the floor and sliding door, but for now we're happy with the final result.